When to use this
The GDPRChecker GTM template is reusable. A new customer does not need a newly developed or separately released plugin. Every customer imports the same template, but configures and publishes a tag in the Google Tag Manager Web Container they own.
Site credentials are not reusable. Every verified website receives its own Site ID and Ping Token. Never copy credentials from a test store, another customer, or another domain.
Use the official template when Google Tag Manager is installed across your website and your team manages analytics or advertising tags in that container. The template replaces the older Custom HTML installation method.
Use your own Google account and the Web Container that belongs to your website. You do not need to invite GDPRChecker as a user or grant GDPRChecker access to your Google Tag Manager account.
If your GTM account is empty, first create an account and a Web Container for your website, then install that Container's GTM-XXXXXXX code site-wide. The GDPRChecker template configures consent inside GTM; it does not install Google Tag Manager itself.
The template immediately sets analytics_storage, ad_storage, ad_user_data, and ad_personalization to denied through Tag Manager's native setDefaultConsentState API. It then loads the GDPRChecker runtime and sends visitor choices through updateConsentState.
This gives teams one place to manage GDPRChecker, Google Analytics, Google Ads, and other marketing tags. Sites that do not use WordPress or Shopify can also use GTM as their installation method without repeatedly editing website code.
Once configured and published, analytics and advertising storage remain denied until the visitor makes a choice. Accepting, rejecting, changing, or withdrawing consent updates the relevant Consent Mode v2 signals automatically.
Do not install the template and the regular GDPRChecker script at the same time. One runtime installation per page is sufficient.
Importing and saving the template alone does not change the live website. It becomes active only after you create a tag with the correct Site ID and Ping Token, assign Consent Initialization - All Pages, test it in Preview mode, and publish the GTM container.
Step-by-step instructions
Open your site in GDPRChecker
Sign in to GDPRChecker and select the website you are installing. If it is a new website, add and verify the exact production domain first. Open Setup > Install Script, choose Google Tag Manager under Platform guides, and keep this page open. You will copy this site's Site ID and Ping Token later; do not use credentials from another site.
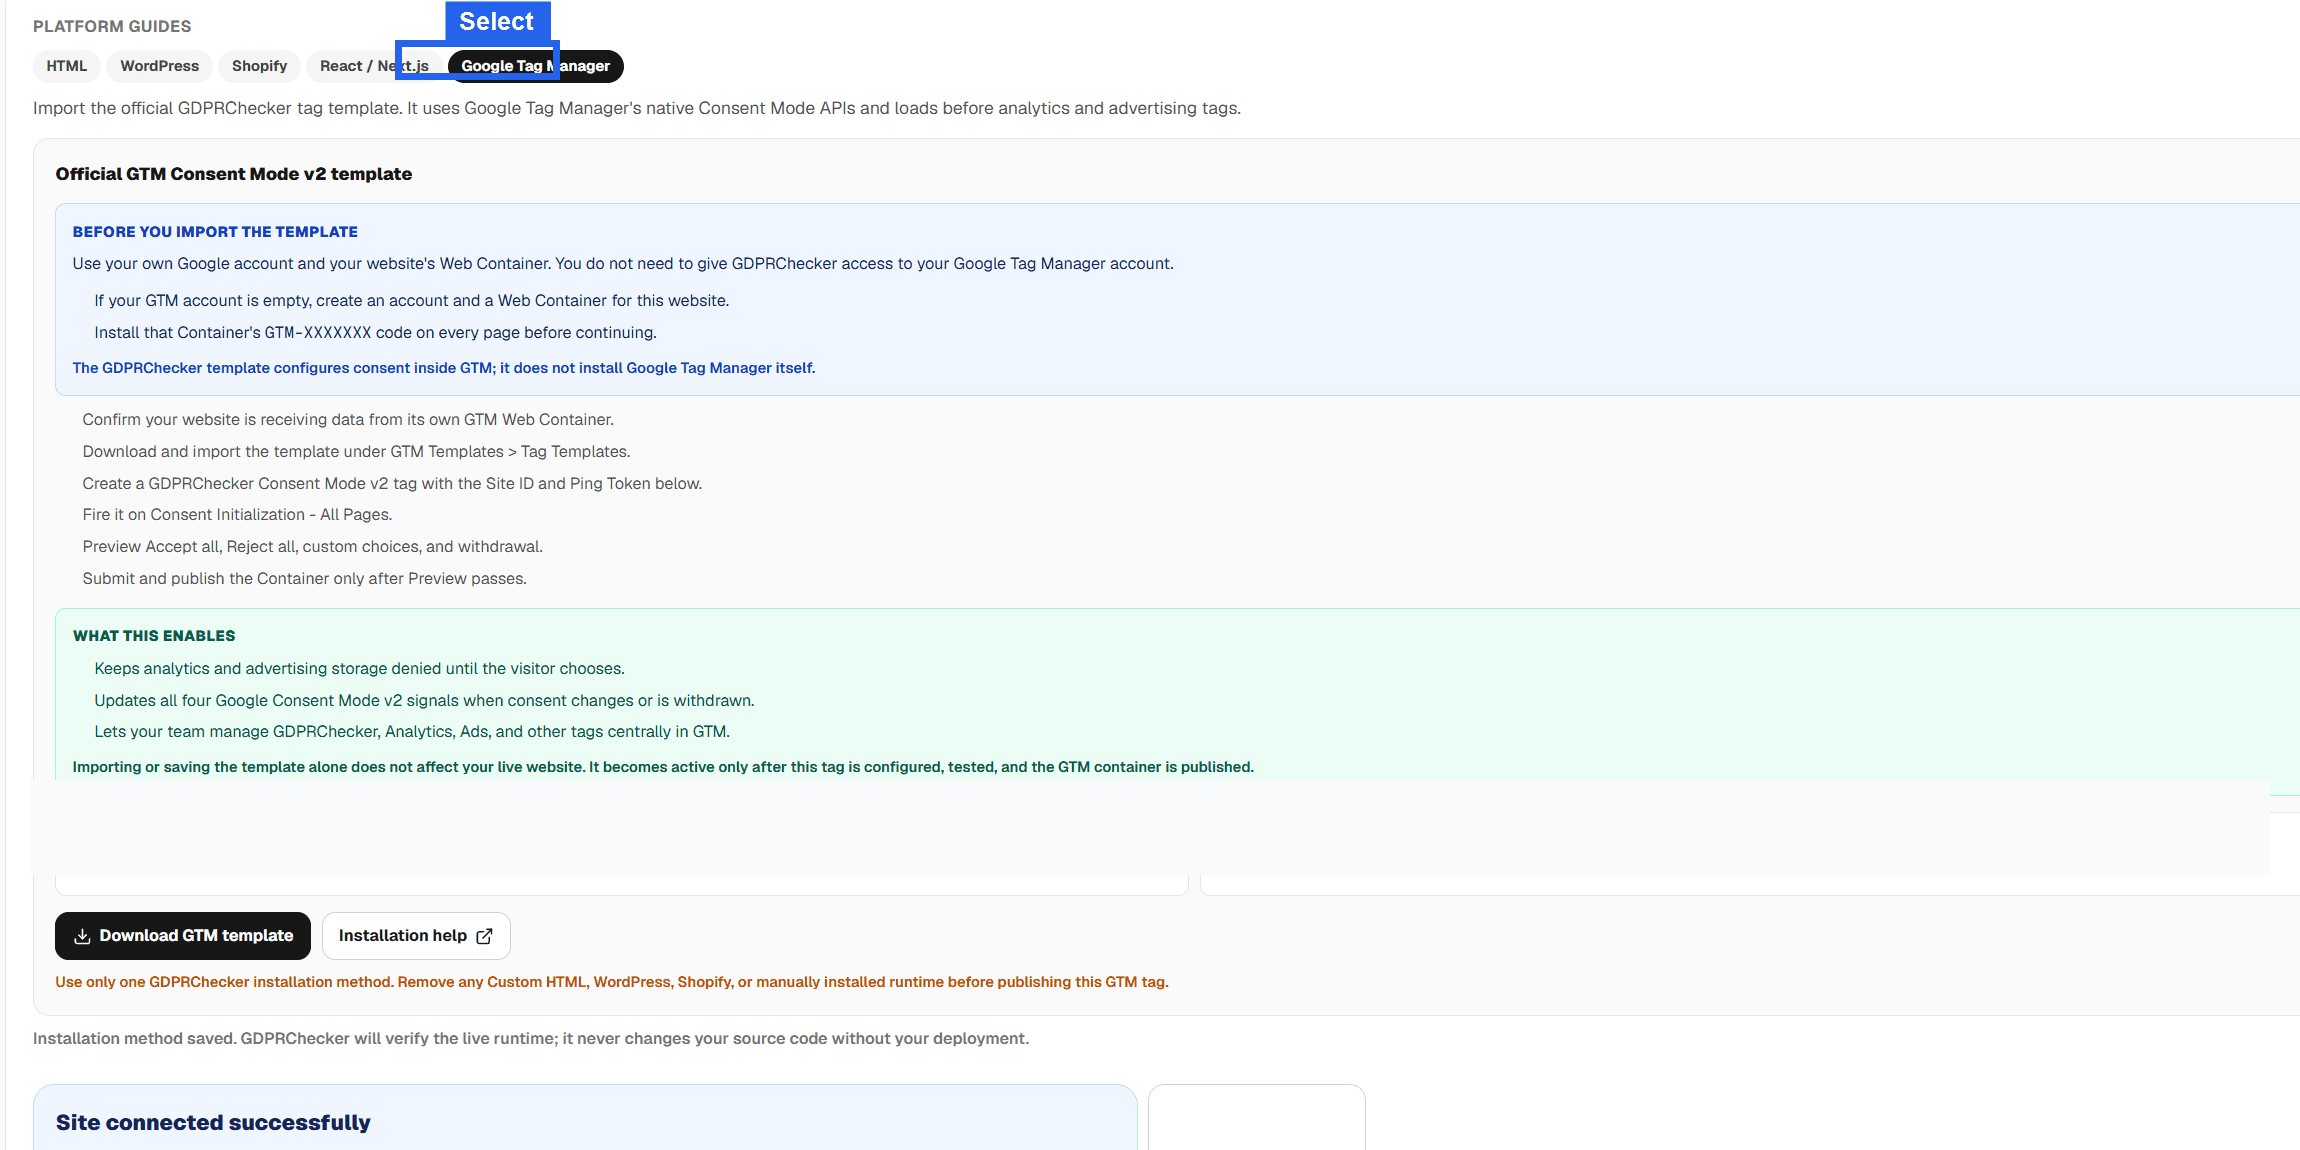
Open the installation panel for your verified site and select Google Tag Manager under Platform guides. Credentials are hidden in this example. Open or create your GTM Web Container
Open Google Tag Manager and sign in with the Google account that manages this website. Select the existing Web Container whose domain matches the site. If none exists, choose Create Account, enter the organization and website name, select the Web target platform, and create the Container. Record its public Container ID in the GTM-XXXXXXX format.
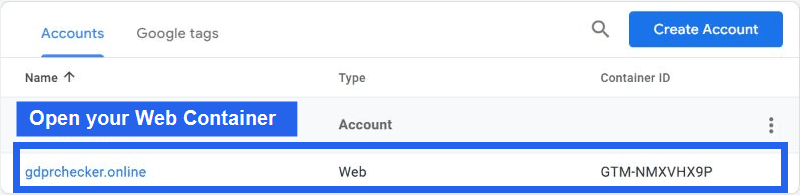
Select the Web Container for the website you are protecting. Use Create Account if no suitable Container exists. Install the GTM Container on your website
Select the GTM-XXXXXXX Container ID to open Google's installation dialog. Add the script snippet immediately after the opening <head> tag and the noscript snippet immediately after the opening <body> tag on every page. WordPress users can use a suitable GTM installation method; Shopify users can add both snippets to the active theme layout. Save the website change, open the live page, and confirm that the source contains the same Container ID before continuing.
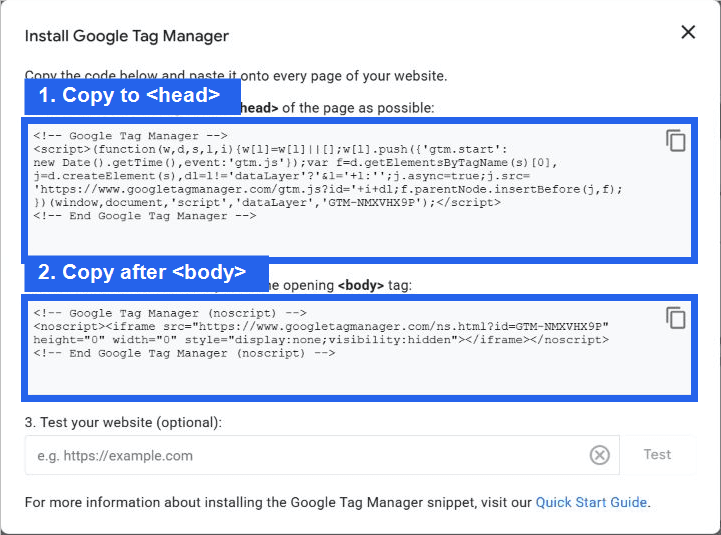
Open the Container ID or Install Google Tag Manager dialog, then place both snippets in the locations shown. Download the GDPRChecker template
Return to the selected site's GDPRChecker installation panel and choose Download GTM template. The file is named gdprchecker-gtm-template.tpl. This template file is shared by all customers; downloading a fresh copy ensures the user installs the current version.
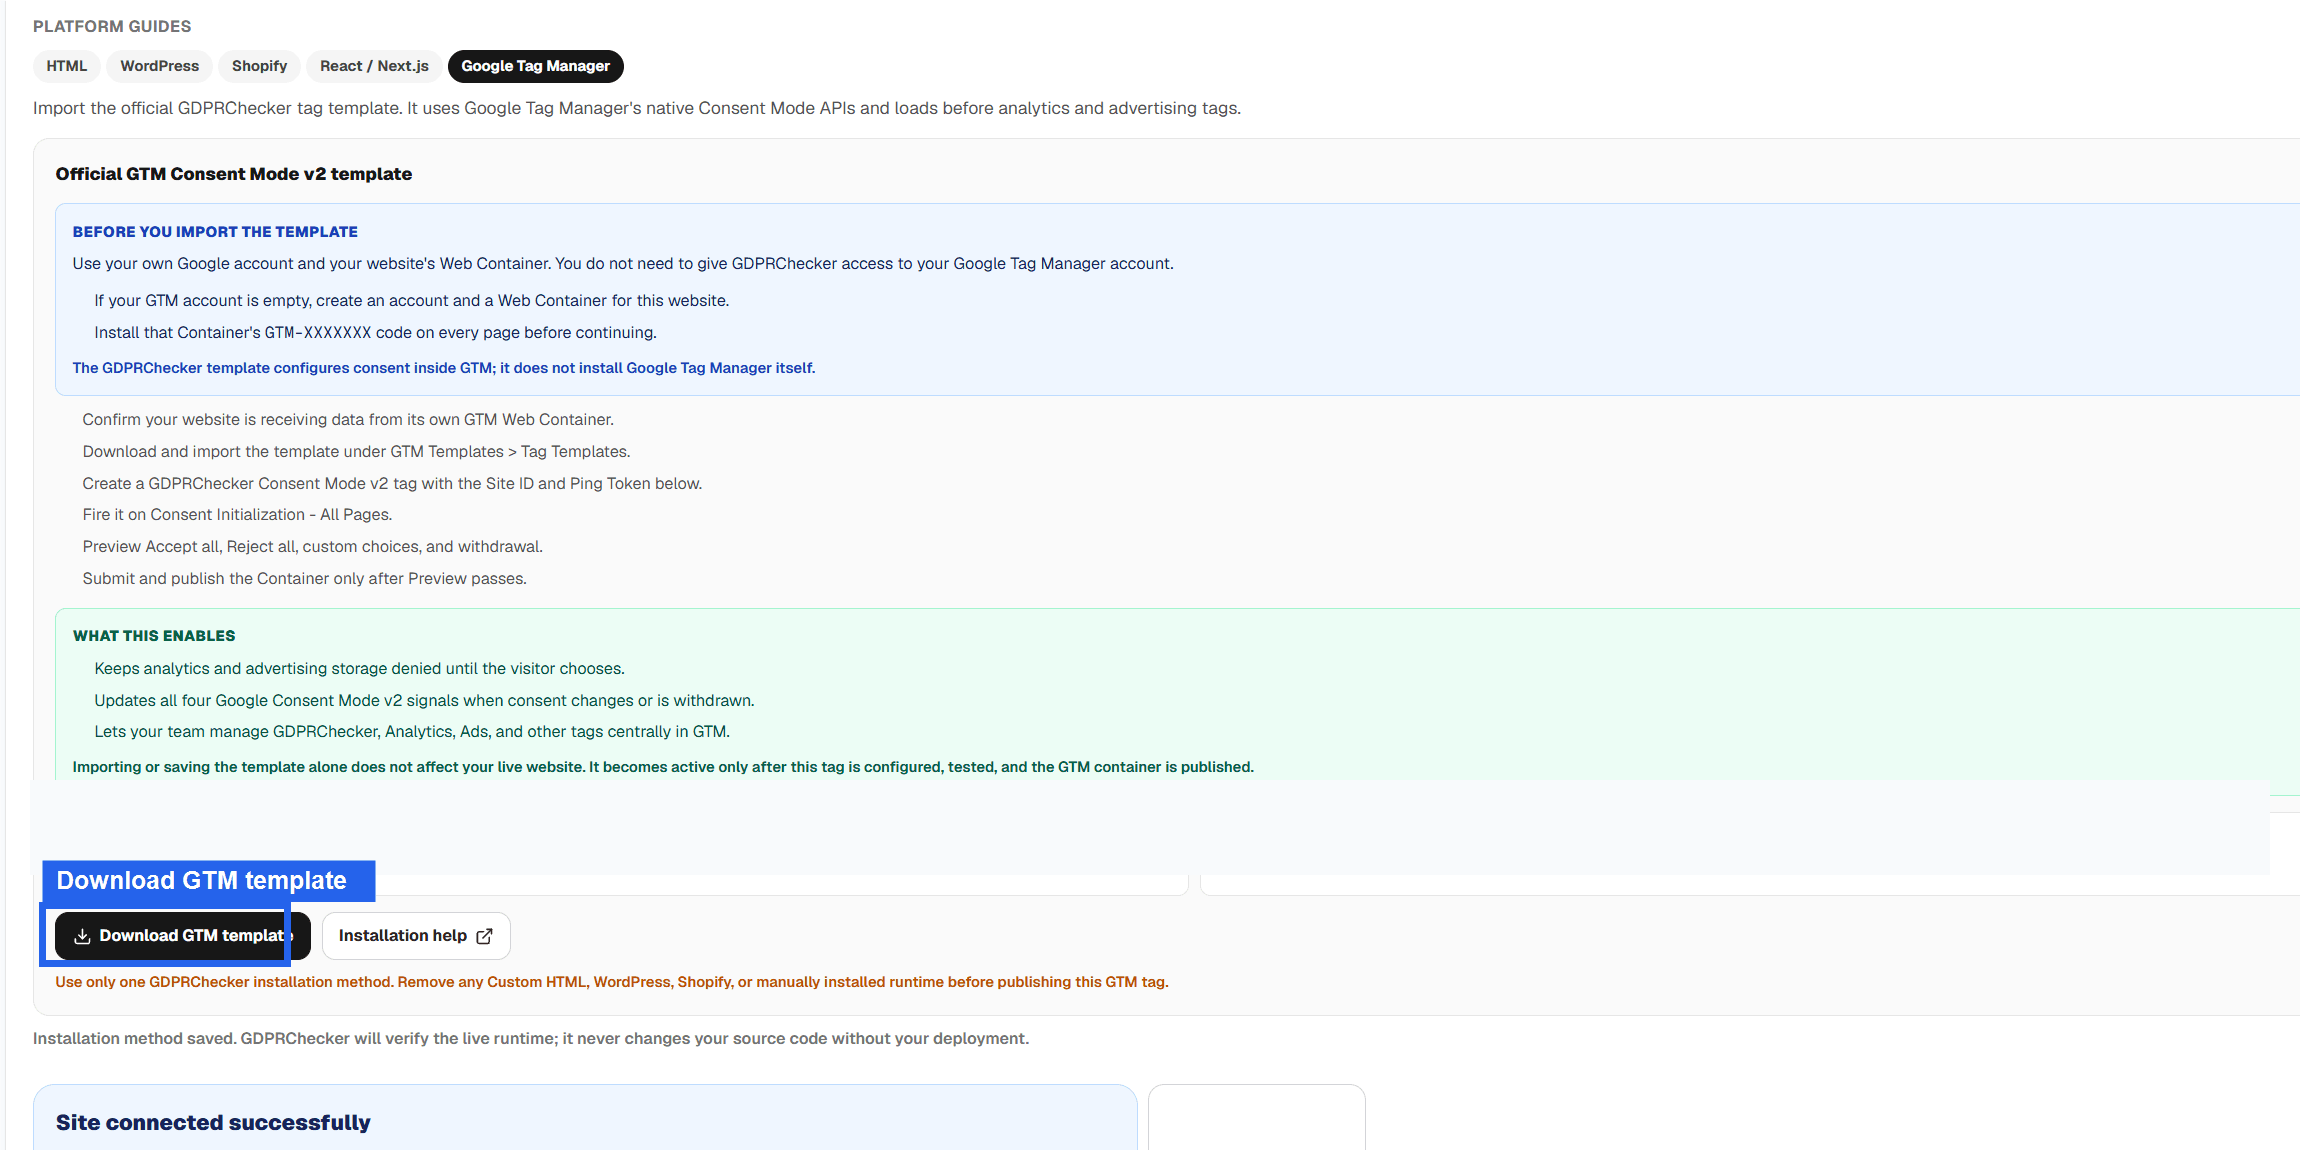
Select Download GTM template. The downloaded file is named gdprchecker-gtm-template.tpl. Import and save the template in GTM
In the website's GTM Web Container, open Templates. Under Tag Templates, choose New. In the Template Editor, open the top-right three-dot menu, choose Import, and select gdprchecker-gtm-template.tpl. Review the requested permissions and select Save. This adds the reusable template to this Container; it does not yet run on the website and does not publish anything.
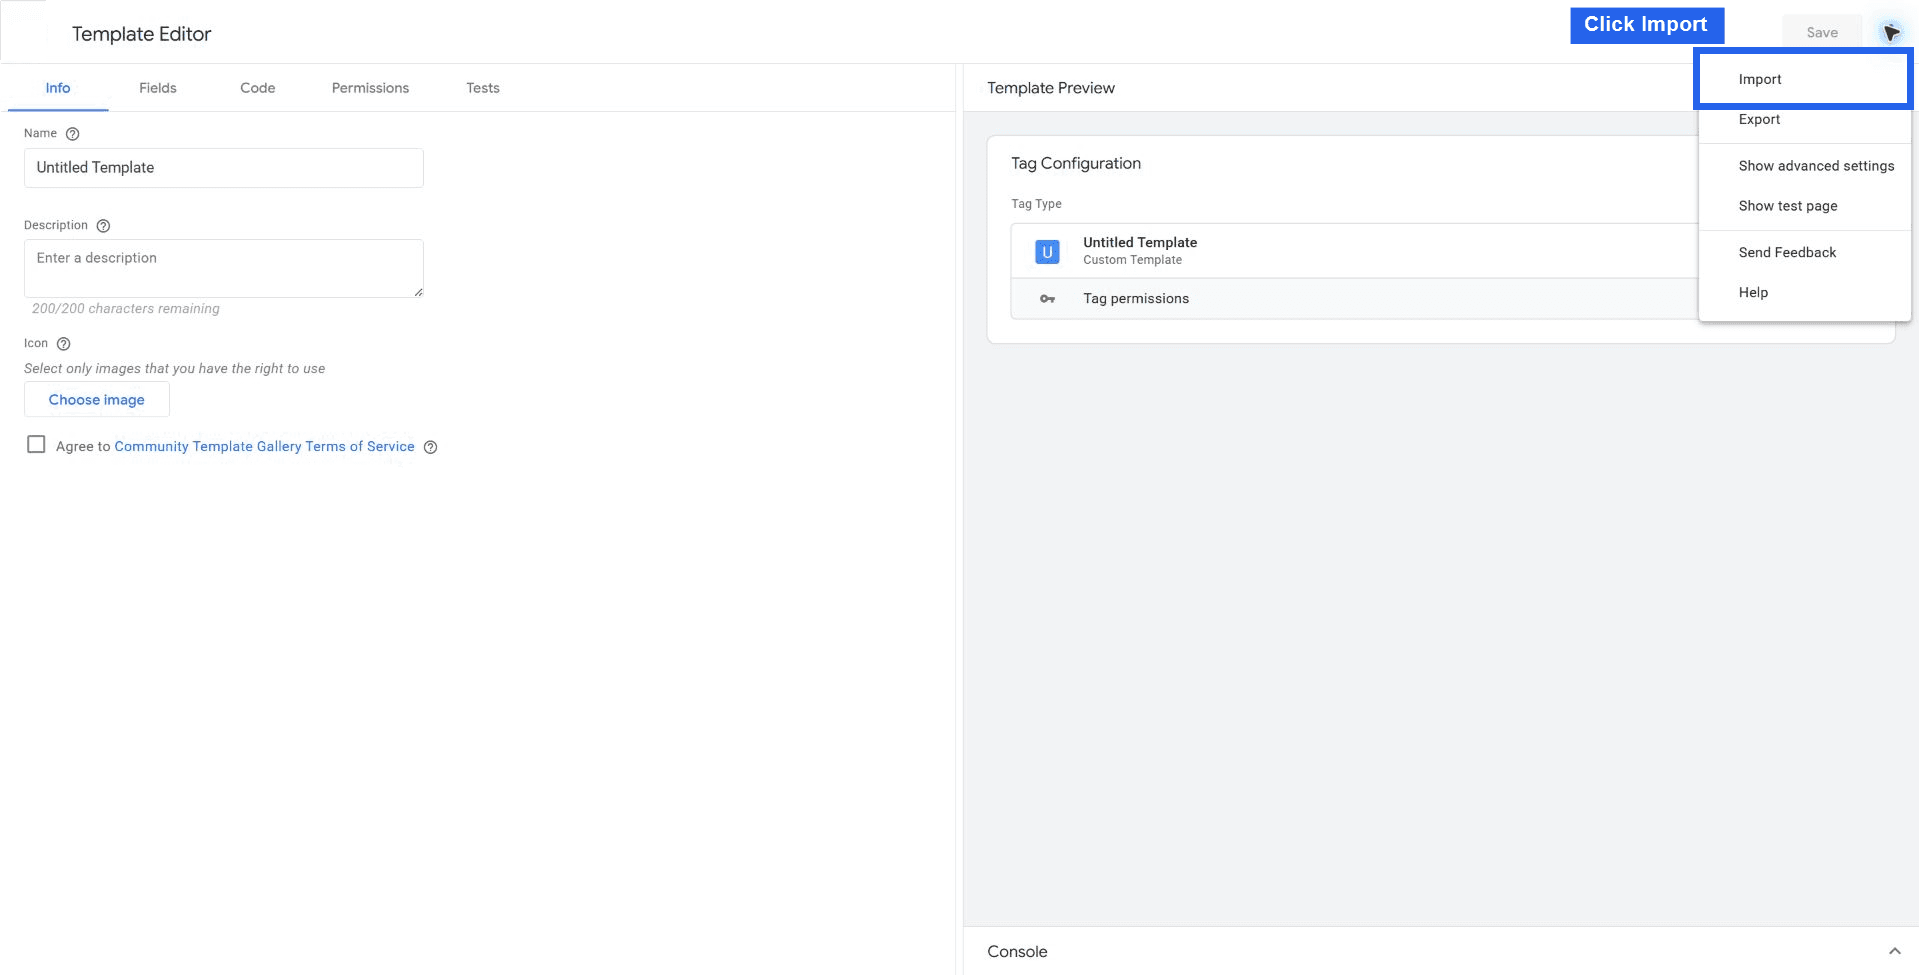
In the Template Editor, open the top-right menu and choose Import, then select gdprchecker-gtm-template.tpl. Create the GDPRChecker tag
Open Tags > New and give the tag a recognizable name, such as GDPRChecker Consent Mode v2 - Production Site. Open Tag Configuration and select GDPRChecker Consent Mode v2. Copy the Site ID and Ping Token from the same website's GDPRChecker installation panel, paste them into their matching fields, and check for missing spaces or truncated characters. These credentials connect runtime heartbeats and consent evidence to the correct GDPRChecker site.
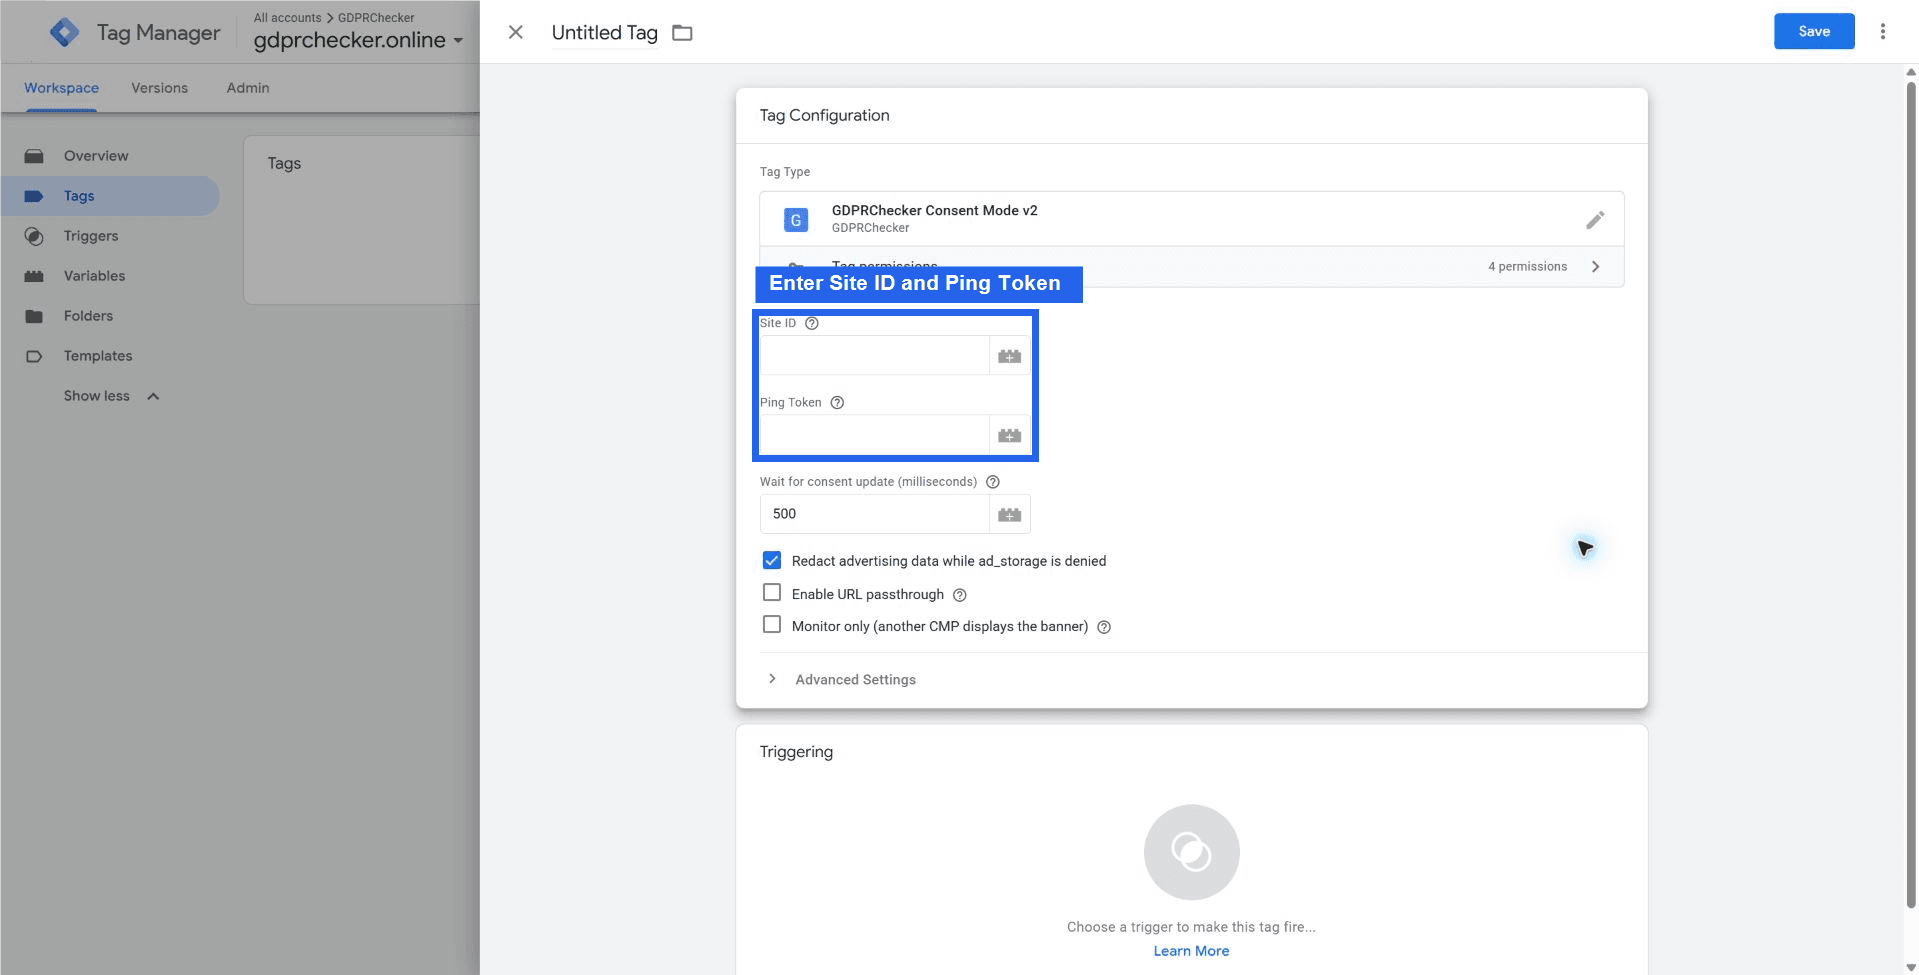
Copy the Site ID and Ping Token from your GDPRChecker installation panel. Never reuse credentials from another site. Review the measurement options
Keep advertising data redaction enabled so advertising identifiers are removed while advertising consent is denied. Leave URL passthrough disabled unless the site's measurement policy explicitly requires it and its Conversion Linker setup has been reviewed. Use Monitor only only for a planned migration where another CMP remains responsible for the visible banner; do not enable it for the normal GDPRChecker installation.
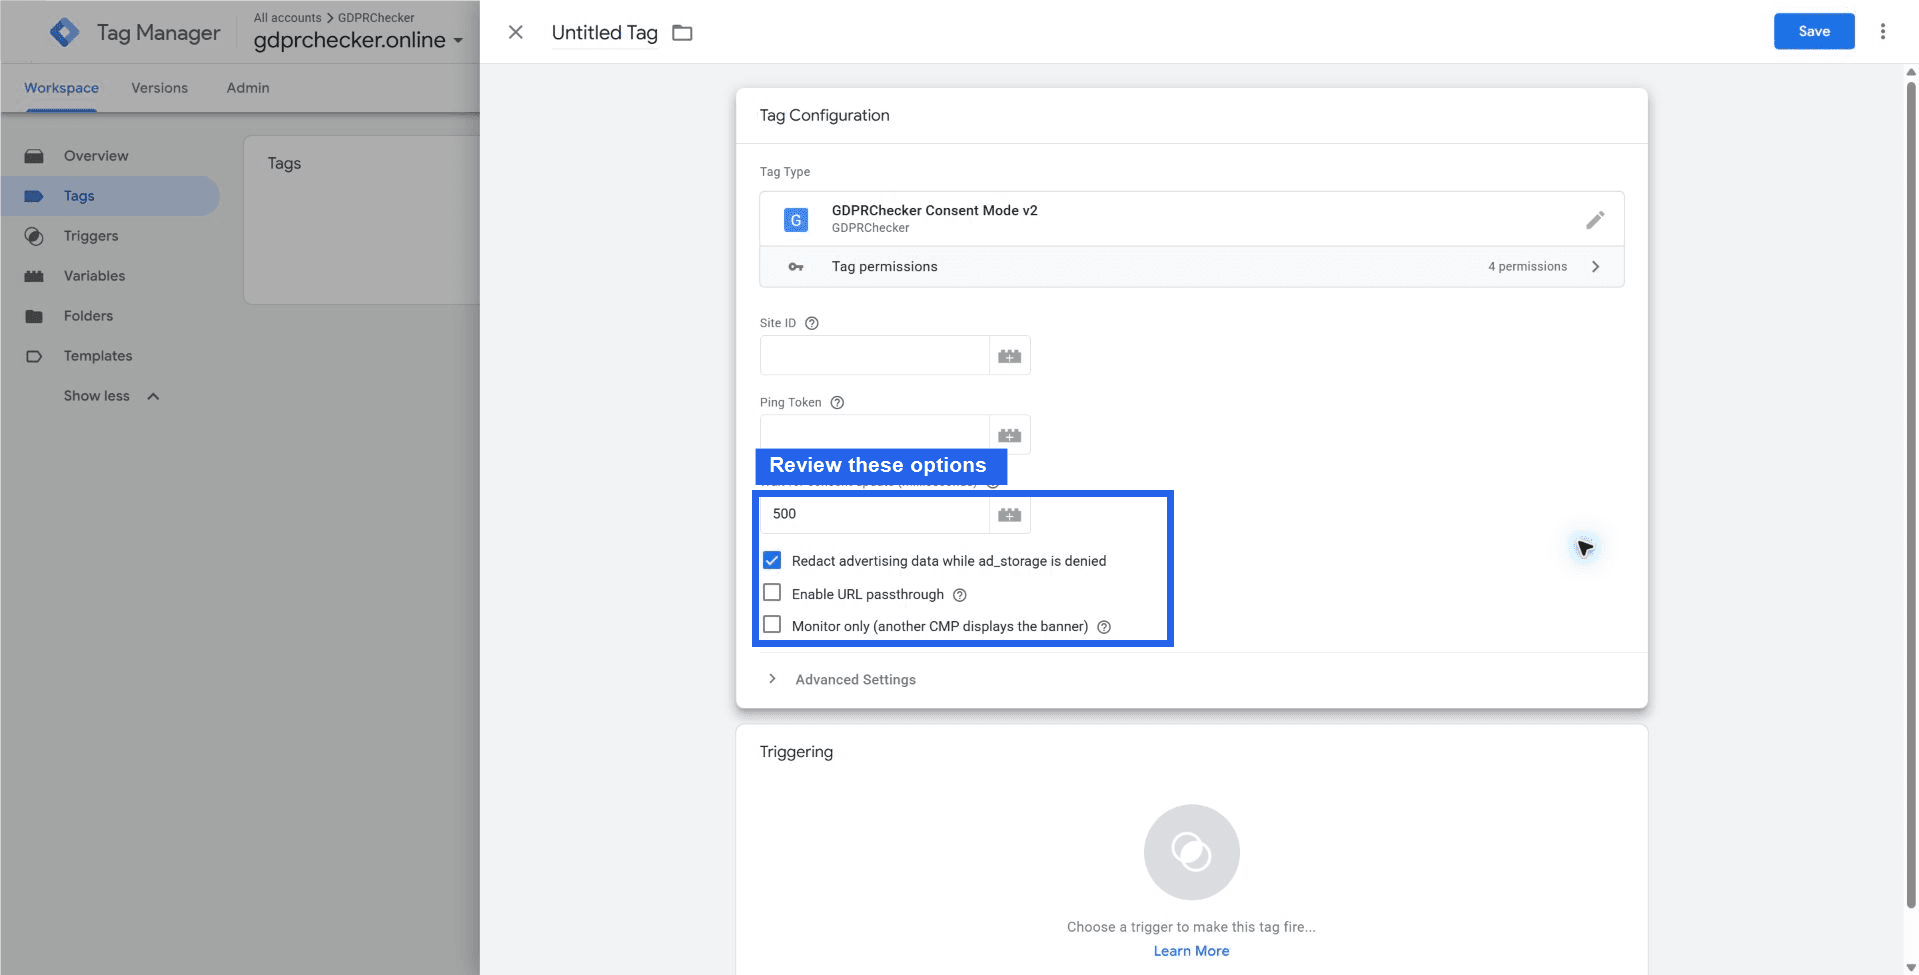
Leave advertising data redaction enabled. Turn on URL passthrough only when your measurement setup requires it. Set the Consent Initialization trigger
Open Triggering and select Consent Initialization - All Pages, then save the tag. Do not select the ordinary All Pages trigger: Consent Initialization is the special earliest stage that establishes denied defaults before Analytics, Ads, and other measurement tags evaluate consent.
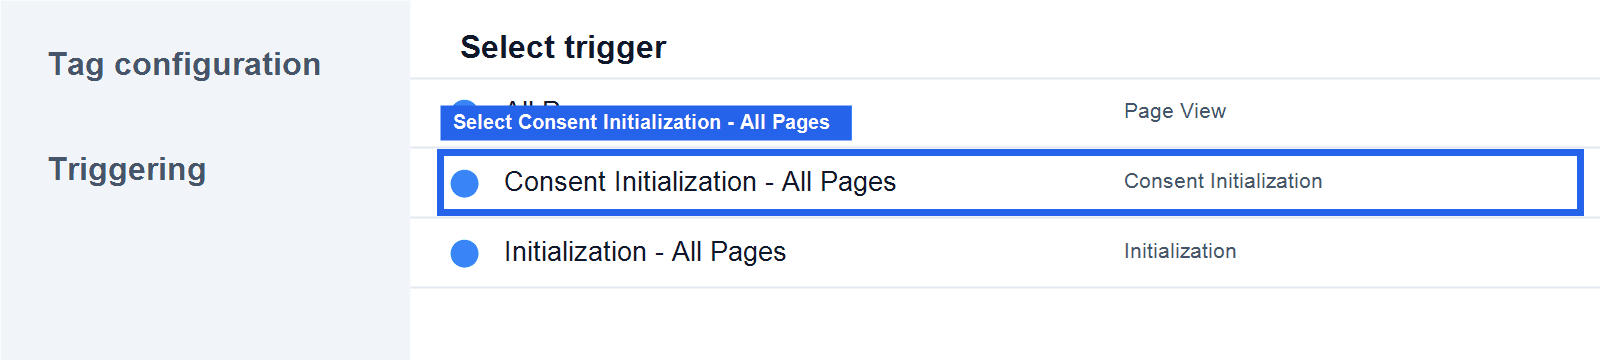
Select Consent Initialization - All Pages, not the ordinary All Pages trigger. Confirm the saved tag configuration
Reopen the saved tag and perform a four-point check: the Site ID belongs to this domain, the Ping Token comes from the same site record, advertising data redaction is enabled, and Consent Initialization - All Pages is the only trigger. Keep Site ID and Ping Token hidden in screenshots and support tickets. If a GDPRChecker WordPress plugin, Shopify App Embed, manual runtime script, or older Custom HTML tag is active, disable that duplicate before testing.
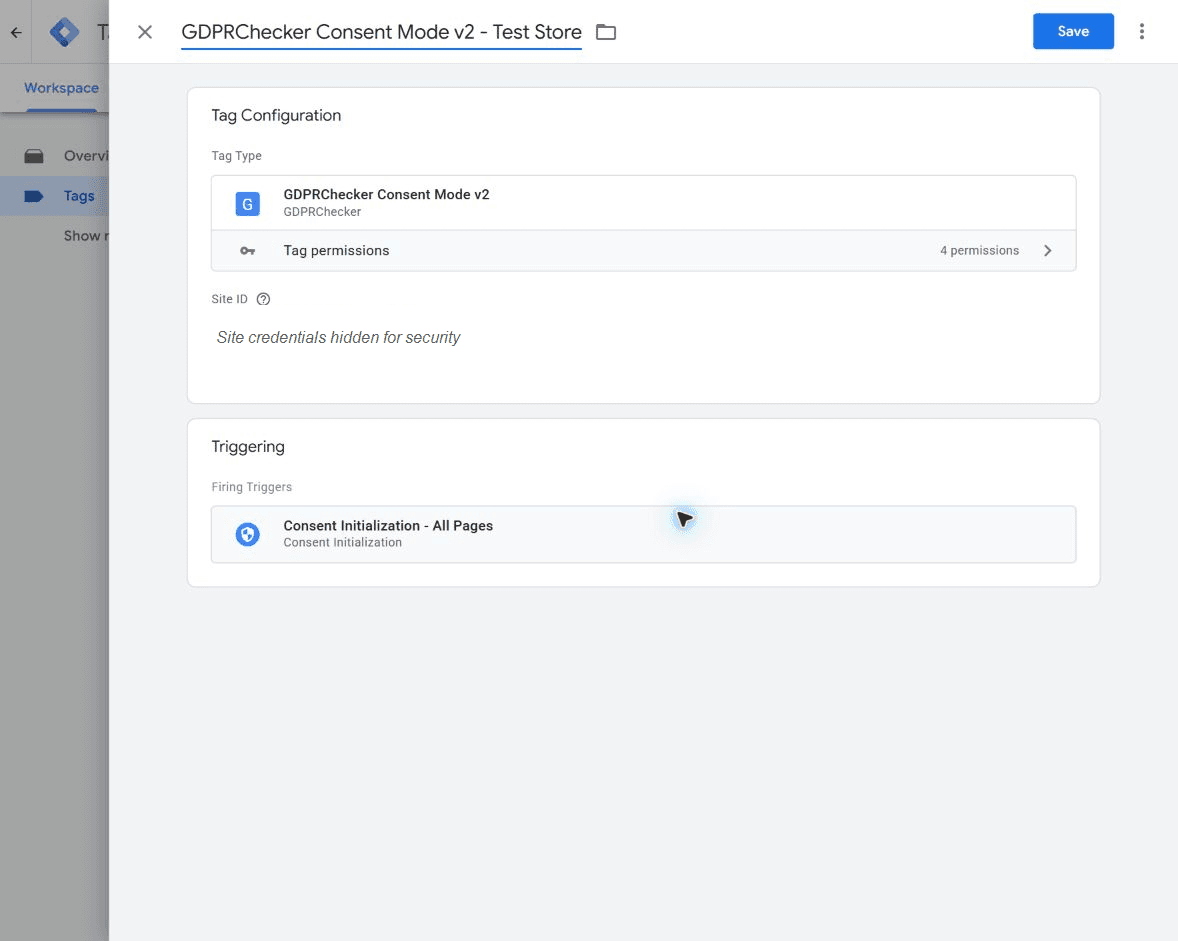
Verify the saved tag and trigger before Preview. Site-specific credentials are hidden in this example. Connect the website in Preview mode
Return to Workspace and select Preview. Enter the exact HTTPS production or authorized theme-preview URL and choose Connect. Keep both the website and Tag Assistant windows open. If the first attempt times out, reload the connected website once and retry. Continue only after Tag Assistant reports Connected, finds the expected GTM Container ID, and shows GDPRChecker Consent Mode v2 firing exactly once.
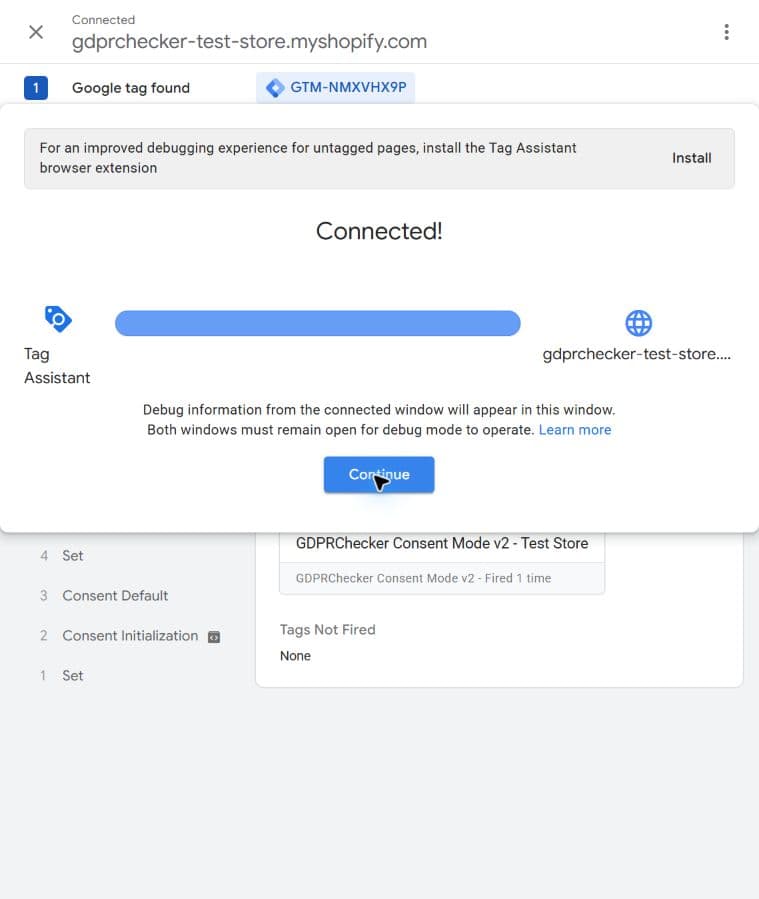
Connected confirms that Tag Assistant can read the on-page GTM Container and its Preview events. Verify denied defaults on a fresh visit
Use a fresh browser session with no prior choice for this site. Before selecting anything in the consent banner, open Tag Assistant, select the Consent Default event, and open the Consent tab. Confirm that analytics_storage, ad_storage, ad_user_data, and ad_personalization all show Denied under On-page Default. If any value is granted, stop and correct the configuration before publishing.
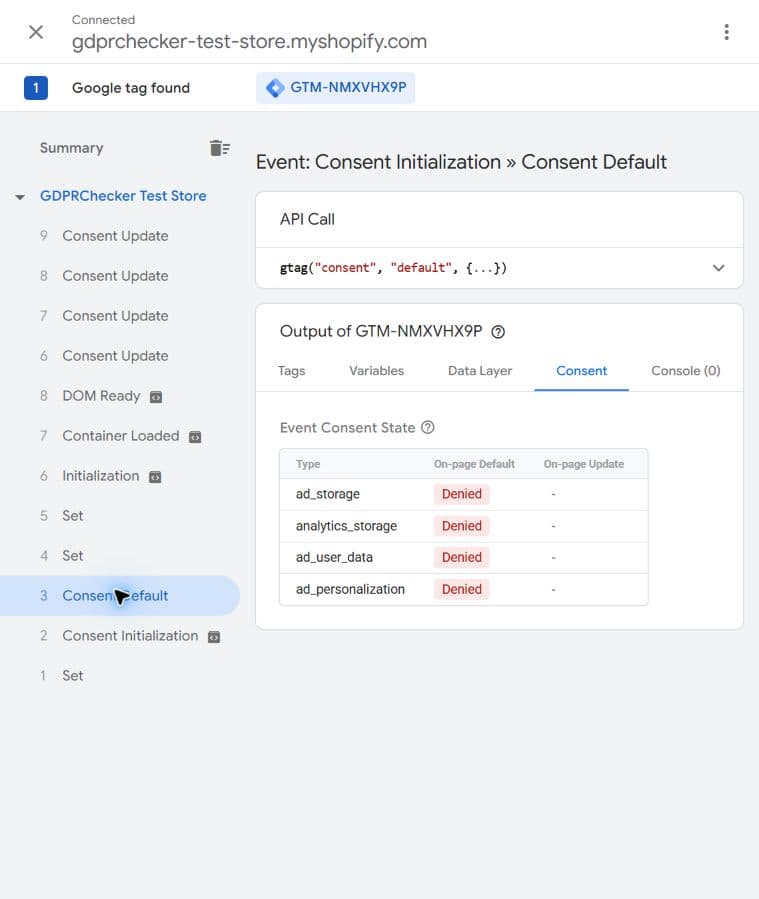
All four signals must be denied before the visitor makes a choice. Verify Accept all grants consent
On the connected website, select Accept all. Return to Tag Assistant, open the newest Consent Update event, and confirm that all four On-page Update values are Granted. If Google Analytics or Ads tags are installed, also confirm they run only after the relevant granted update rather than before the banner choice.
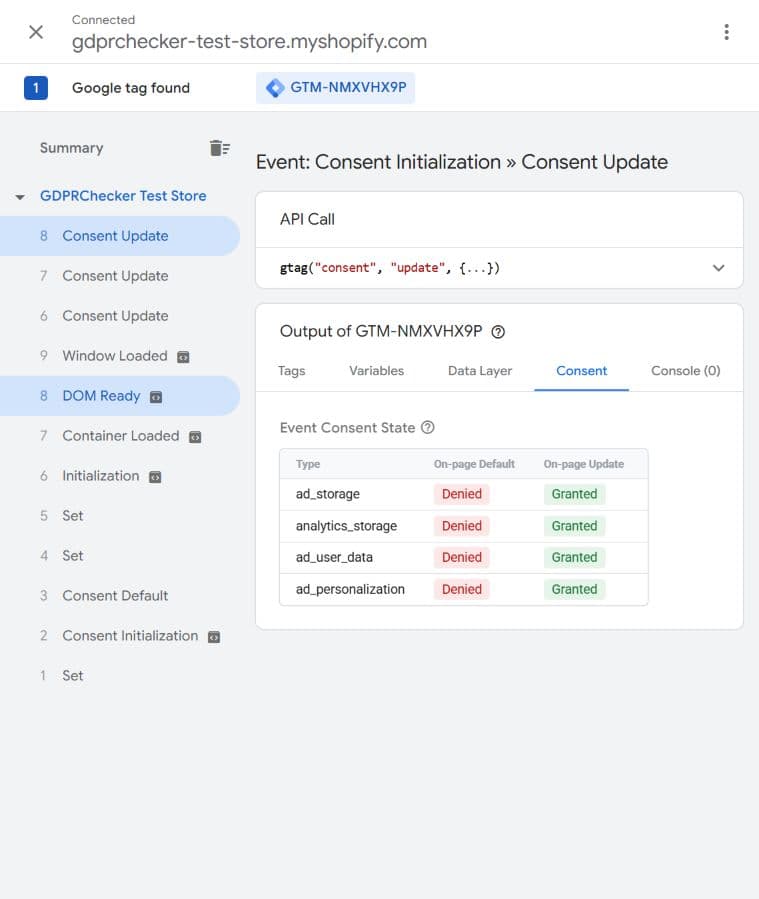
Accept all changes every Consent Mode v2 signal from the denied default to granted. Verify rejection and consent withdrawal
Test both paths. First, start another fresh session and choose Reject non-essential as the first decision; the newest Consent Update must keep all four values Denied. Second, after an Accept all test, open the persistent Privacy settings entry and choose Reject non-essential; this withdrawal must change all four values from Granted back to Denied. Finally, use Manage preferences to test an analytics-only custom choice and confirm only analytics_storage is granted.
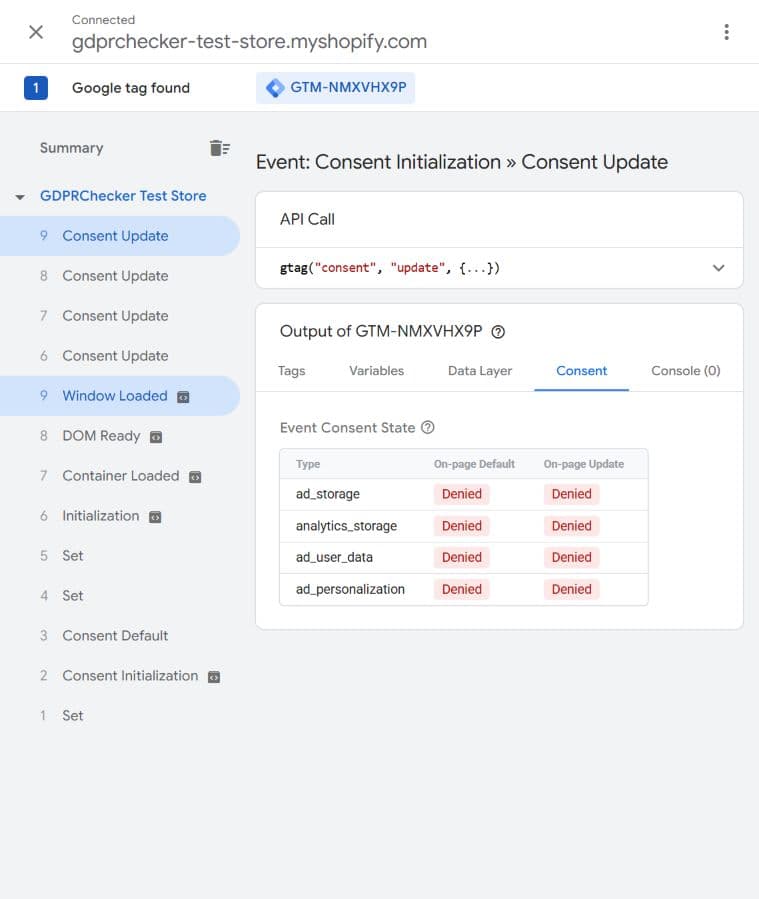
Rejecting optional cookies or withdrawing prior consent returns all four signals to denied. Publish and verify the live installation
After fresh-visit, accept, reject, custom-preference, and withdrawal tests pass, return to the GTM Workspace and select Submit. Choose Publish and Create Version, enter a descriptive version name and test summary, then publish. Every new customer performs this publication in their own GTM Container; GDPRChecker does not republish a central plugin for each customer. After publication, open the live website in a private window, confirm the published Container loads, check Analytics and Ads behavior for denied and granted states, and verify the runtime connection in the correct GDPRChecker site record.

Publish only after every Preview consent test passes, then repeat the essential checks on the live website.
Expected result
Before a visitor chooses, all four Consent Mode v2 signals are denied. Analytics consent grants analytics_storage; marketing consent grants ad_storage, ad_user_data, and ad_personalization. Rejecting or withdrawing consent returns the corresponding states to denied.
The GDPRChecker dashboard receives a live runtime heartbeat, while GTM Preview shows the template firing on Consent Initialization before ordinary page-view tags.
Google Analytics and Google Ads tags can use the visitor's current consent state, while the marketing team continues to manage tag deployment centrally in GTM instead of changing the website for every update.
Troubleshooting
My GTM account has no containers
Create an account and a Web Container for your website, then install the provided GTM-XXXXXXX code on the website. Customers use their own Google account and Container; no GDPRChecker account access is required.
Preview cannot connect to the website
Confirm the selected GTM Web Container is installed on the preview URL and that the Container ID matches. Importing the GDPRChecker template does not install the base GTM Container code. On Shopify theme previews, reload the connected storefront once if the debug bootstrap appears only after Preview starts.
Google rejects the template during import
Download a fresh copy from GDPRChecker and import the .tpl file without changing its contents. Confirm you are creating a Web Tag Template, not a variable or server-container template.
Consent remains denied after Accept all
Confirm the GDPRChecker runtime loaded successfully and the tag contains the Site ID and Ping Token for the selected site. Remove duplicate consent tags and verify the template is the one firing on Consent Initialization.
The runtime loads twice
Remove the older Custom HTML tag or manually inserted GDPRChecker snippet. If a WordPress plugin or Shopify App Embed is already active, disable that installation before enabling the GTM tag. Keep exactly one GDPRChecker runtime installation path per page.
Several domains share one GTM Container
Create a separate GDPRChecker tag for each verified domain, enter that domain's unique Site ID and Ping Token, and restrict each tag with a Page Hostname condition. Never allow tags for two different sites to fire on the same page.
The consent buttons are hidden in a Shopify theme preview
Collapse the Shopify preview toolbar using its small grabber at the bottom of the storefront, or widen the preview. The toolbar can cover the last row of a bottom-positioned consent banner even though the live storefront layout is correct.